Monday 31 August 2015

Scottish quilt history introduction

Scottish Log Cabin

As part of the C&G Diploma in Patchwork and Quilting, the students need to learn about the last 200 years of their local quilt history, so for my class that is British quilts.  I wanted us to go and visit a collection of historic quilts, but there isn’t really one locally.  I think many of the museums have one or two, but that wasn’t enough to justify a visit.  However, there is nothing like actually seeing and touching the quilts to bring them to life.  Luckily someone suggested I got in touch with Hazel Mills and she in turn suggested that Jan Rae could help and both of them came out here on Saturday to share their quilts and knowledge with us. 
A Hawick broken heart quilting pattern
I’m sure it was of benefit to the students, but it was also magnificent for me.  Although I have a reasonable knowledge of quilt history, as I am interested in history in general, Hazel and Jan were amazing.  Their combined knowledge was huge and we learnt about many different styles and types of British quilts.  For example, I knew about North Country and Welsh quilting, but I hadn’t heard of Hawick quilting, with its distinctive broken heart pattern and often thistles too.  As we expected, there were many wholecloth examples, which of course, don’t photograph well and so seemed much more impressive in real life than just as illustrations in books.  Jan also explained about ‘Comfy’ quilts, an actual brand name of manufactured quilts, which were very popular for a while.  They are completely reversible.
The 'Comfy' Quilt

The C&G syllabus says the students should also be aware of regional variations.  So as well as the wholecloth quilt showing the broken hearts and thistle indicative of Hawick quilting, we saw some other distinctively Scottish ones, such as this lovely blue based log cabin and also an unusual (for Scotland) quilt with Turkey Red stars.  
Turkey Red Star Quilt

This was fascinating as one quilt history book I had read said that there was no quilting tradition in Scotland.  Obviously, this isn’t true – maybe it is just more hidden or less celebrated than in other countries or part of the UK.
Looking at the log cabin
Although we were concentrating on British quilts, we did get to see some other gems such as Hazel’s Kantha from India.  Jan also brought along some American quilts and it was interesting to see the differences.


Hazel's Kantha


An exciting part of the experience was being able to handle these quilts, all of which were in fantastic condition.  For example, it was amazing to feel the variations in wadding between a wool one and a cotton one.  Indeed there one was which we were still unsure at the end of the day whether it contained wadding or not, it was so fine.  Another had obviously been washed several times and the wadding had split and concentrated at the quilting.  It made it a lot easier to see the quilting patterns when you held it up to the light.  It was a really privilege to be able to handle all of these quilts.  I’m incredibly grateful to both Hazel and Jan for sharing all their knowledge so generously with us and bringing quilt history alive for us.   I also have to admit I did my ‘fan girl’ bit and got Jan to sign my copy of her book ‘The Quilts of the British Isles’ – the best book on the subject!

My favourite was one of the last ones we saw – made almost entirely from quarter square triangles, this quilt was a very patriotic one.  The red and white triangles divided the quilt, like the bands on the Union Jack flag and in the border, used in bigger chunks was a fabric celebrating the Golden Jubilee of Queen Victoria in 1887.
Queen Victoria Golden Jubilee fabric


Thursday 27 August 2015

Inspiration: Stitch Stories by Cas Holmes


I have to admit I’m not buying many books at the moment.  I see many books which look interesting, but I don’t quite get round to buying – I persuade myself I really need to finishing reading all the books I have at home first.  And we do have a lot of books.
However, there is always a book for which I have to make an exception and at the Festival of Quilts, I had no hesitation in immediately purchasing Cas Holmes’ new book ‘Stitch Stories’ which had only come out that week.  And I haven’t regretted it. 

It is a great book – exactly what I am looking for in a book on textiles at the moment.  It showcases the work of a diverse range of artists, mainly working in stitch.  It isn’t just the usual suspects, which is fab as it introduces me to a whole new range of artists to go and look up and to explore their work.  Cas must have a wonderfully inquisitive mind to be aware of not just these artists, but the exhibitions and techniques she also references.  To be able to pull all of these artists together into one book shows how much goodwill she can generate – she must be a generous spirit. 

Cas displays a fantastic breadth of knowledge in the book, covering many ideas and techniques, all related with storytelling through textile art.  I appreciate the book more, because it is not a ‘how-to’.  It doesn’t have any projects.  However, it does go briefly into some of the techniques Cas uses in her own work and by other artists.  The book also has photos of sketchbooks and work in progress, which is always fascinating.  I really like the idea of ‘shadow drawing’ that Cas suggests and will definitely be trying that out soon (when the sun finally shines...).
A word on the way the book is made: it is gorgeous.  At a very basic level, Batsford textile books now have fabric covers, which feel lovely – a fantastic move.  The photographs are luscious and make me want to get straight into the studio and start working – always a good thing!
It is quite a scholarly book, with many quotations from catalogues and thinkers in the textile field as well as Cas’ own thoughts.  It is a book which will repay many reads; one to keep coming back to for inspiration and to egg me on to keep creating meaningful work.  If you are looking for a good book about textile art today, I can’t recommend this one highly enough.


Monday 24 August 2015

SpongeBob's friend meets the Minions - a new work

Elements of Our Past by Gillian Cooper 2015
This is my latest piece.  I’m calling it ‘Elements of Our Past’, but the kids are referring to it as ‘Patrick from SpongeBob meets the Minions’.  It is based on an Ancient Greek sculpture – I really liked the shape, so I drew it out a couple of times, then redrew it to full size on lining paper.  
The original drawing
As soon as the kids saw it on my wall, rather than complimenting me on the lovely shape, they all said ‘It’s Patrick, SpongeBob's friend’.  TV has a lot to answer for.
Screen printing the fabric
All the fabric was hand dyed and then screen printed with thickened dyes using shredded paper as a mask (thanks Catherine!).  I ironed fusible webbing on to back of the fabric and cut it into patches and ironed them in place. 
All ready for the final stitching
Using mainly thicker than normal thread (a Wonderfil speciality that Mags Ramsay put me onto at last year’s Festival of Quilts – thanks Mags), I free machined over the figure to give it more definition.  I really like the ‘sketch-like’ effect of these lines. 
Stitching in progress
Once it was finished and up on the wall, one of the kids came in and admired it.  Great, I thought, finally appreciation for my art.  He said: ‘You know Mum, it doesn’t look like Patrick any more, it’s much better.  It looks like a Minion too...’

I hope that you will see my ‘Unsung Muse’ in this piece, the ancient eternal goddess and not just a mixture of kids’ cartoon figures!

Detail of 'Elements of Our Past'


Monday 17 August 2015

6 steps to using thickened dye

12 of my thickened dye circles placed together - trying out possible layouts
I’ve been experimenting with thickened dyes this summer and greatly enjoying the experience of splashing colour onto the fabric. 
Thickened dye is a very versatile way of adding colour to fabric.  It is very easy to use and the results can be rather good.  The basic process is very easy:
My print table during the painting process - it was a fresh dropcloth
1.   Soda ash your fabric
The fabric has to be prepared for dyeing (pfd), which simply means you have to give it a good wash beforehand to rid it of any coatings.  I use cotton or silk.  I have used some polycotton because it was there and it did work, it just gave a softer effect. 
Soak it in a solution of soda ash and water, then leave it to dry. If you want a very defined effect, you can give it a quick iron, but be careful not to scorch the fabric as the soda ash makes burning occur quicker.
My beautiful assistant decided to have a go too
2.   Make up the thickened dye
I use Manutex, which I bought from Kemtex to thicken my dye.  It is made from seaweed, so the smell can be a bit interesting if it is left too long.  I add three heaped tablespoons per litre of water and then stir really well.  It then needs to be left for a while to thicken up and I find that any lumps tend to dissolve during the waiting time.  At the same time I make up the Procion dyes in a liquid form.  You can add the powder to the Manutex, I just feel I have more control and it is safer to use them in liquid format. 
When I’m ready to paint, I scoop a couple of spoons of Manutex into a yoghurt tub and then I squirt some dye in on top.  Once mixed together, I test the colour and add more dye or Manutex if necessary.
Painting in progress
3.   Painting
The fun bit.  You can use brushes or squirty bottles.  As I was wanting a more general effect, I used spoons and the side of an old credit card to make my marks.  Remember, that the colour on the bottom is the most likely to be the one that stays on the fabric.
Using an old credit card to spread the dye
4.   Batching
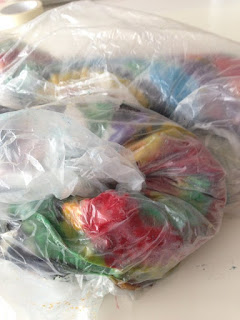
As with any form of dyeing, you need to give the dye time to sink into the fabric.  I’ve always been told it is best for it to stay damp and for that reason, I roll the painted piece up in plastic and leave it overnight.  If you are working on a big piece, you can paint another area once the dye has dried and then wash it out all at the same time.
Fabric batched waiting to washed out
5.   Washing
When it is ready, I unroll the fabric into the sink and soak it in cold water, until the water runs clear.  If I’m not intending to add more dye, I then give it a quick wash in the washing machine, just to make sure.
A square painted, waiting to be washed
6.   The next step
Once dried, the fabric can be used in any way, including adding more dye, or painting.  I made 30 odd of these squares, loosely basing the design on spirals and circles.  I think I’m going to piece them together and then add more detail in stitch – hand and machine, before appliquĆ©ing some more shapes over the top.  Of course, this may change!

One of the circles after washing out.  I tried to find the same one as in the photo above, but it was really hard to work out which one was which!
  I’m running a workshop using thickened dye on 9 October - email me if you are interested in joining me.


Monday 10 August 2015

5 Fabulous Reasons I Love the Festival of Quilts

Bitter Harvest by Clare Smith
I spent Friday to Sunday at the Festival of Quilts at the NEC in Birmingham last week.  As usual it was fantastic and there was a ridiculous amount to see and do.  It was lovely to see so many of my C&G students down there and one thing I’m going to ask them to do at the next class (this is a ‘heads up’ if you reading!) is share what their highlights were as everyone finds something different which really enthuses them.  So this is my version for the 2015 Show
Portrait of a Memory by Christine Chester

1.   Amazing galleries of work by individual artists and groups
This year’s highlight was Quilt Art (unfortunately no photos allowed) as well as Christine Chester’s thought provoking pieces about dementia.  Though Our Hands also had some interesting works and unusual techniques.  I loved the piece by Clare Smith with the dye dripping through it, running where it wished.
Mahri Prince's work
2.   Student work
Okay, this one is a bit of a cheat as part of my reason for concentrating on the student work was because two of my students, Janet Lindsay and Mahri Prince, had been selected to display their work.  It was a bit like a proud parent moment seeing how well their work fitted into the show.  They are both very talented ladies (as well as being a pleasure to teach – obviously as all my students are!)
Janet and her work
3.   Friends
No photos of these (I tend to do photos of ‘things’ rather than people) but meeting up with so many lovely quilters I know is one of the main highlights of the Show.  Quilters are such a friendly and supportive group of people, so each year, my group of friends expands, which is fantastic – meeting old friends and making new ones.
Terry Donaldson - Sussex Coast
4.   Shopping
This is probably further up the list for most people, but I’m not great shopper.  However, there are always lots of tempting goodies at the Show.  This year, I justified my purchases because I need to ‘try things out’ for my students.  Well, that’s my excuse and I’m sticking to it.
Philippa Naylor's Miniature
5.   Disagreeing with the judges on the competition quilts
Yes, I know the judges have a thankless task, but it is always fun to see quilts which to my mind seem better than the winners.  A wise person once told me that as the judging has to follow a tick box format, often it is more informative to look at the judges’ choices instead, as they are the quilts the judges appreciated, but which didn’t ‘fit the boxes’.  It is also incredibly difficult as there are just so many beautiful quilts and there can only be one winner per category.
Robbie le Poidevin  - Secret Cove

So that’s it all over with for another year.  Can’t wait until next time. 

Mavis Walker - The Chess Set


Tuesday 4 August 2015

Inspiration: Ruth Higham - a tribute


Some people are just special – they have that aura and a powerful effect on those they meet.  My friend and fellow quilter, Ruth Higham, who died at the weekend, was one of those exceptional individuals. 
I met Ruth purely by accident 10 years ago.  I had just moved back up to Scotland and I didn’t know a single person here who was interested in textiles.  So when I saw there was to be a talk by two artists as part of the Quilt Art exhibition at the Collins Gallery and the opportunity to meet some of the makers, I jumped at the chance to go.  I was very nervous as everyone seemed to know each other, but I carried on and went and sat down in the lecture hall.  A lovely lady sat down next to me and started chatting – it was Ruth. 
I couldn’t have had a better introduction to Scottish textiles and quilting because Ruth was at the centre of it.  Along with Isabel Patterson and Patricia Macindoe, she had just run the first Loch Lomond Quilt Show.  As a result of this original meeting, I ended up exhibiting twice at the Loch Lomond Quilt Show, spent a year generally trying to help the show, taught C&G Patchwork and Quilting and above all, gained a wonderful friend.

Speak to virtually any quilter in Scotland and they will have some connection or story related to Ruth.  She was an inspiration to so many people.  Her own artwork was beautiful and meaningful and she had a lovely way with hand stitching.  She was always eager to try out new things and experimented with lots of techniques.  In particular, I am thinking of her work in breakdown printing.  Above all she was keen to share her knowledge and enthusiasm with others.  Originally at Cardonald College and then at the Loch Lomond Studio, she was a thought-provoking and very generous teacher.  Ruth asked me to teach City & Guilds Patchwork and Quilting with her three years ago and I learned so much from her vast knowledge of quilting.  She was interested in all areas: traditional, quilt history as well as art quilting and art cloth. 
When she had to stop teaching at the Studio, she encouraged me to set up on my own – something I would not have got round to doing without her hefty push and her belief in me.  She and Isabel were also incredibly generous in helping me stock my teaching studio with some of their spare supplies.  I can’t use the purple or emerald green dyes without thinking of Ruth as these are colours I associate strongly with her work and ones I wouldn’t have chosen myself.  Nonetheless, they are creeping into my palette and work.  The way I am teaching C&G is a direct result of her influence, for which I will always be grateful. 
She continued to be inspiring right to the end.  Even when the cancer was not going away, she was finding positive aspects of the experience and continued stitching and living as full a life as she could.  Truly a great role model.  In case this makes her sound too saintly, Ruth also had a wicked sense of humour and shared similar tastes to me in trash television.

I am incredibly sad that my dear friend died at the weekend.  She was far too young (especially in quilting terms!) and too full of life and exciting plans. She will be sorely missed not just by her family, who were centre of her busy life, but also by her huge circle of friends.   I feel incredibly privileged to have known Ruth and been inspired and encouraged by her.  I have been very lucky to have been able to count her as a friend and will continue to draw on all she taught me, particularly in her great kindness and generosity of spirit.  


Related Posts Plugin for WordPress, Blogger...

Popular Posts