Tuesday 24 May 2016

Adding some bling

I have been teaching from my home studio for a year now.  I thought I would enjoy it, but have been surprised at just how much I love it.  Part of this is due to experimenting and constantly challenging myself to learn new things to share with the students, but it is mainly due to the students themselves.  They are lovely - so inspiring, experimental, enthusiastic and (mostly) with a great sense of humour.

One of my lovely students, Pat Grant, has just been on a Colouricious trip to India, which she greatly enjoyed.  At the last meeting of her Certificate Group, as well as showing us the amazing photos from her holiday, she gave us all a little goodie bag of textile things as a little gift.  I told you I had fabulous students.
My bag of goodies

Inspired by the bag, which to be honest contained things I would never normally chose to work with, and also by others in her group who just seem to produce work at a fantastically quick rate, I decided I need to make something using all the bits in the bag.
The contents of the bag


I thought blues and purples would go well with the contents, so I made the backgrounds on firm sew-in Vilene, using transfer paints.  Having cut them to size, I then did the 'easy' bit first - printed on top of it using the little print block.  It was a lovely block and the repeats worked well.  I initially tried silver acrylic, but my silver (from The Works) was too watery and didn't show on the blue.  So I used black.  That showed up!
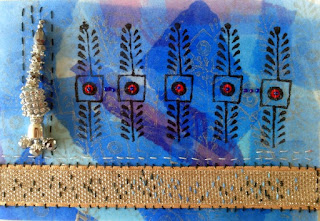
The first piece


I then stitched on the gold braid-ribbon.  This is the part that challenged me most.  On both pieces I ended up stitching into it with other colours as I struggle with 'bling'!  As I was trying hard to use sparkles, I added some sequins on the first piece and some small beads from my own collection, before finishing it with the giant silver tassel.
The second piece


I decided to add more detail on the second piece, and added some hand dyed knit along the bottom.  More ribbon was added to tie it in and make a more cohesive piece.  I attached the mirror to some chiffon using a shisha embroidery stitch and then stitched that in place.  

I'm not sure that these pieces are very successful, but it was really good to try something so outwith my comfort zone!  I have a collection of beads and bling, but I never really use them as they don't feel obvious to me, so it is a positive learning experience to use them, although I may not be using them again for a while!


Friday 20 May 2016

8 Things to do with an old copy of World of Interiors


I love paper and I love magazines.  Our house is groaning full with both, but I do find it hard to throw out possibly useful bits of paper and gorgeous old magazines.  I've been trying to be a bit tidier and more organised recently and cull some old magazines, but I do find it very hard to just put them in the recycling bin, so I've been trying to use them in artwork.  Here is a list of what I have done with just one copy of World of Interiors.  

You can do a lot with a single magazine, so it isn't really helping with the tidying, but it does make me feel a bit more justified in holding on to it for so long (it is the December 2011 edition).

Do you have any more ideas to add to the list?


  1. Make envelopes
    Don't you think one of these would be so much nicer to receive in the post than a plain brown or white one?  I'm just using a white sticky label to add the address


  2. Labels
    I love little tags and was delighted when I discovered you could buy cutters to make them the perfect shape.  So beautiful photos give beautiful tags.  I've also been making collages from them.


  3. Paper piecing templates
    I ran a workshop on hexagons at the K&S Show in Edinburgh earlier this month and all the hexagon templates were cut from this magazine.  I find the paper in it is the perfect weight for me to work with.  Some people like their templates thicker but I find it too difficult to stitch through.


  4. Glue sheet
    I always need a spare piece of paper to use in the background when I'm glueing.  A magazine is perfect as you can just fold the pages together when it gets too sticky and move onto the next page.
  5. Pages in a book
    I've been making little books recently and carefully selected sheets of the magazine make lovely pages when interspersed with plainer paper.


  6. Collage
    Instant great colour, what could be easier than making a collage from these pages, especially when you cut or rip it up in such a way as the images become indistinct.
  7. Backgrounds
    One of my students (thanks Chrystine!) discovered that when you paint over a glossy magazine page with dark ink, some colours don't take the ink and so remain shining through giving a lovely background to work with.
  8. Inspiration
    This one is almost so obvious it goes without saying.  The colour combinations, the lovely interiors, beautiful gardens, photos from exhibitions and books and the general styling are always very inspiring to make other work from.


Tuesday 10 May 2016

Out & About at Highland Quilters

The only downside about working from home now is that I don't leave the village very much.  It is too easy just to stay put, especially as most things are at least 30-40 minutes away.  So I was very pleased when Highland Quilters in Inverness invited me to give a talk and run some workshops for them.
Luckily the weather improved on Thursday as I set off, so I had a great drive and even managed to go for a short work near Aviemore on route.  I also had to have another break as I had forgotten to take shoes with me as I had put on old trainers to take the kids to school.  They really were not suitable to be seen!
A design in progress
The talk was appreciated and on the Friday I had the group painting to music, rolling dice and sticking tissue paper.  All perfectly normal quilting activities! 
Getting the fabric laid out
In the afternoon, we progressed to fabric, looking at how to recreate our designs with small pieces.
Stitched overnight
There were some lovely quilt designs as a result of this and one of the group had even managed to start stitching her piece before the next day's workshop!
Culloden Battlefield
As the hall Highland Quilters used was near Culloden, I managed a quick visit to the battlefield site after the workshop. 
Culloden Moor

It was very quiet and beautiful and much more atmospheric than my trip to the site of the Battle of Hastings.  The wind, the marshes and the lack of sight at points all added to the sense of place.
Stitching the scraps together
The second day, I shared my scrap piecing methods and we then painted the quilts with watery fabric paint to pull it all together.  After attacking the quilts will hair dryers to speed up drying, we then added details in Markal paintstiks.  
Highland Quilters at the end of the Scrap Piecing for Art Quilts Workshop

I did remember to take photos of this session, including my first ever cheesy shot of all the workshop participants holding their pieces at the end!


Spring Gorse


Tuesday 3 May 2016

Hexagons Galore


Five years ago, I wrote a blog post about starting a hexagon quilt.  I was making it purely for my own pleasure and I wanted to make it for our large double bed.  I had calculated I would need over 2,000 hexagons and it would take me at least 18 months.  Well, that was me being hopelessly over-optimistic as normal!  Five years later and the quilt is still in progress.  Realistically, it is going to take me another five years.
In progress
The process is slow, but satisfying and it is perfect for picking up and stitching now and again.  Mainly I have been stitching on long drives (when I am the passenger!) and on holiday.  It would be great for sewing in front of the TV, but I don't often sit in front of the TV that long at the moment.  It goes in fits and starts.
My hexagon kit
I keep the ongoing pieces in a little pencil case, but the actual top is now getting a bit bulky, so can only be stitched at home.  I worked out the best way of piecing - I make the rosettes, with a central red hexagon, then two full rounds of hexagons and I add 8 white hexagons on one side.  I had played around with the layout trying to work out the best way as I didn't want to be stitching just white hexagons for months on end as I near completion.
An individual section ready to be added to the quilt
I taught hexagons, along with layer and slashing and fabric postcards at the new Knitting and Stitching Show in Edinburgh at the weekend.  It was a lovely event, and great to share my passions with other stitchers.  I also enjoyed catching up with friends old and new.  I had to make a little sample for the hexagon workshop and thought I could just use a piece of the larger quilt in progress... except it didn't look right, so I had a very pleasant day on last Wednesday just hand stitching this piece.
The sample I made this week
I have also started a couple of other little hexagon projects and have paper to make a diamond quilt.  But really, I need to just concentrate and get this one finished... in about five years time.


Related Posts Plugin for WordPress, Blogger...

Popular Posts